What Is Modified Bitumen Installation — And How Does It Work?
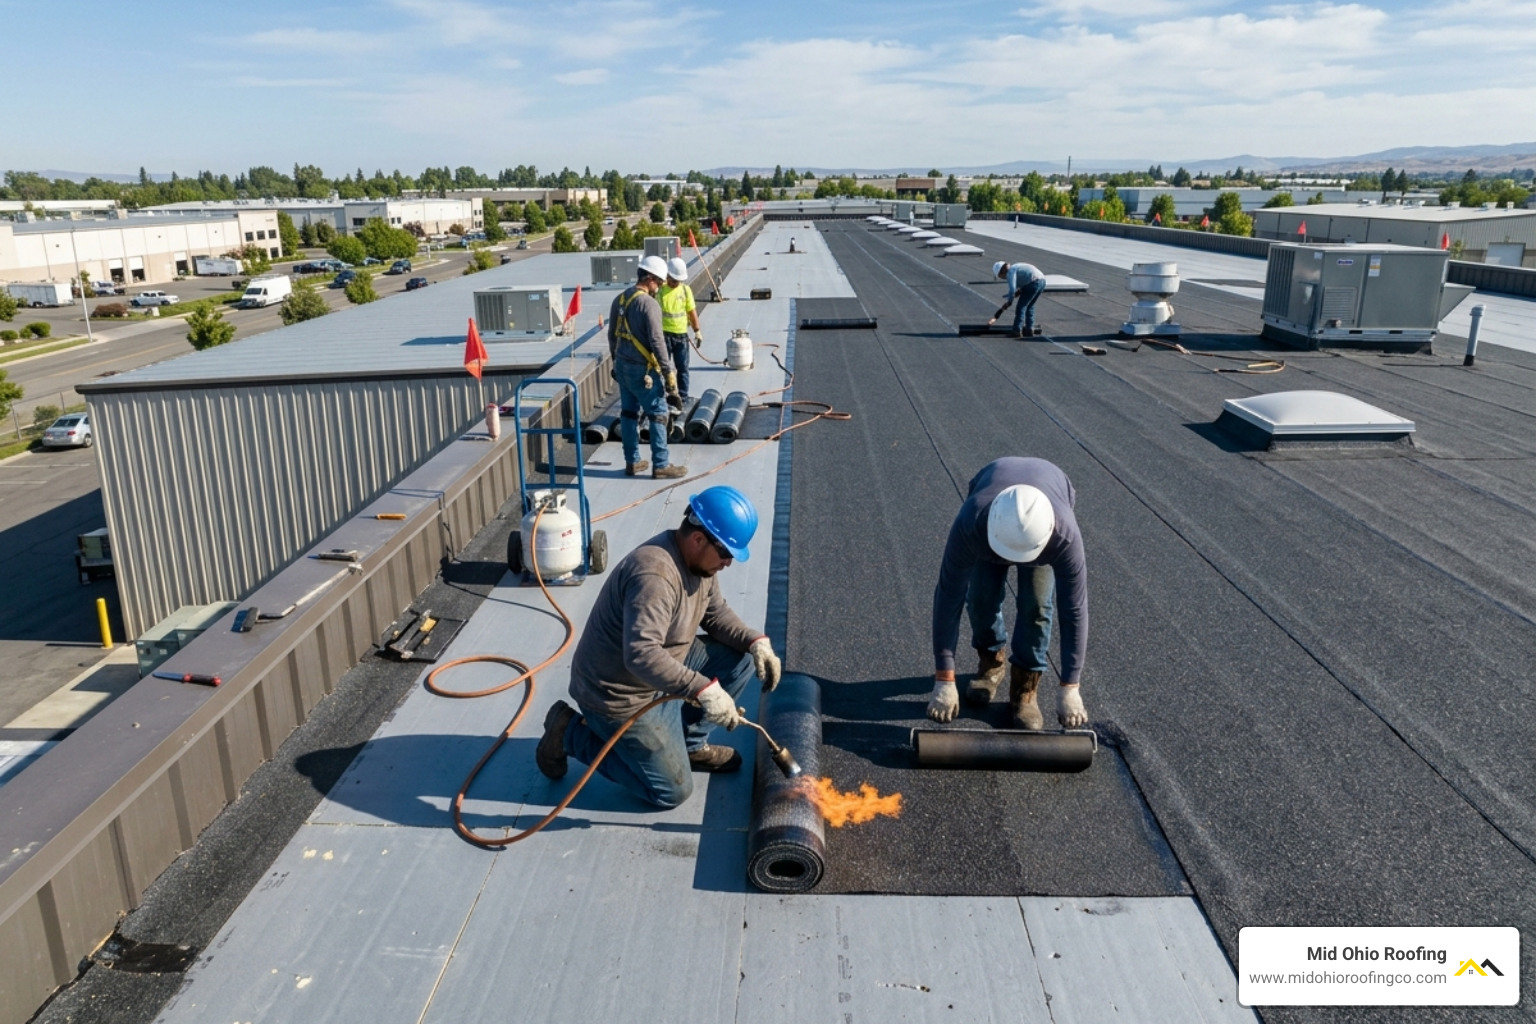
Modified bitumen installation is the process of applying polymer-reinforced asphalt membranes to flat or low-slope roofs using one of four methods: self-adhering (peel-and-stick), torch-down, cold adhesive, or hot asphalt. As a premier provider of roofing services in Ohio, Mid Ohio Roofing ensures these systems are installed to withstand extreme weather. Here’s a quick overview:
- Self-adhering – Peel the release film and press the membrane onto a primed deck. Best for occupied buildings or fire-sensitive areas.
- Torch-down – Use a propane torch to heat-weld the membrane to the substrate. Most durable bond, requires trained applicators.
- Cold adhesive – Spread adhesive with a squeegee, then embed the membrane. No open flame required.
- Hot asphalt – Apply mopping asphalt at 400°F minimum to bond multiple plies. Traditional method, less common today.
A complete system includes insulation, a base sheet, and a granulated cap sheet — all working together to protect your building from water intrusion. According to GAF, one of the world’s largest roofing manufacturers, modified bitumen provides superior tensile strength compared to traditional felt systems.
Modified bitumen is specifically designed for roofs with a pitch of 4/12 or less. When properly installed and maintained, these roofs last 20 to 30 years. As an Ohio roofing contractor, Mid Ohio Roofing has seen how Ohio’s freeze-thaw cycles can stress a poorly installed flat roof — and how a well-installed mod-bit system holds up decade after decade.
I’m Albert Wengerd, owner of Mid Ohio Roofing, and I’ve worked across residential and commercial flat roofing projects throughout central Ohio, including hands-on experience with modified bitumen installation on everything from warehouse roofs to low-slope residential structures. In this guide, I’ll walk you through everything you need to know to get it done right.

Understanding Modified Bitumen Systems: SBS vs. APP
Before we get our hands dirty with the modified bitumen installation, we need to talk about the two main “flavors” of mod-bit: SBS and APP. Think of these like different types of tires for your car; one is built for grip and flexibility, while the other is built to handle the heat.
SBS (Styrene-Butadiene-Styrene)
SBS is essentially “rubberized” asphalt. By adding synthetic rubber to the mix, manufacturers create a membrane that is incredibly flexible. This is the gold standard for Flat Roof Systems in regions like Columbus, OH and Newark, where the temperature might be 90°F in August and -10°F in January. SBS acts like a rubber band—it stretches as the building moves and returns to its original shape.
APP (Atactic Polypropylene)
APP is “plasticized” asphalt. It uses plastic polymers to increase the bitumen’s melting point and UV resistance. It’s a tough, durable material that is often torch-applied. While it’s great for high-heat environments, it can become brittle in extreme cold. For most of our clients in Central Ohio, SBS is the preferred choice due to its superior elastomeric properties during our brutal winters.
Key Differences in Modified Bitumen Installation
The choice between these two often dictates the installation method. According to technical guidelines for polymer-modified bitumen, APP membranes are almost always heat-welded (torched) because they require higher temperatures to reach a fluid state. SBS, on the other hand, is much more versatile. It can be installed via hot mopping, cold adhesive, or the increasingly popular self-adhering method.
When we handle a Commercial Roofing project, we look at the building’s occupancy. If you’re running a school or a medical facility in Springfield, OH, you probably don’t want the “pungent stench” of hot asphalt or the risk of open flames. That’s where SBS self-adhering systems shine.
Choosing the Right Membrane for Ohio Weather
In Ohio, the primary enemy of a flat roof is the freeze-thaw cycle. Water gets into tiny cracks, freezes, expands, and tears the membrane apart. Because SBS has such high tensile strength and elasticity, it can handle these stresses better than traditional Built-Up Roofing (BUR). If your current roof is failing, a Roof Replacement using a two-ply SBS system is one of the most resilient upgrades you can make.

Preparation and Deck Requirements for Modified Bitumen Installation
You wouldn’t paint a dirty wall, and you certainly shouldn’t start a modified bitumen installation on a compromised deck. The substrate is the foundation of your entire roofing system.
Surface Dryness and Structural Integrity
The roof deck must be smooth, dry, and free of debris. If you’re working with a wood deck, check for “soft spots” or rot. For plywood, we recommend a minimum thickness of 1/2 inch on 24-inch rafter centers. If you have a concrete deck, it must be fully cured and primed. This is a standard requirement for any high-quality Roof Installation.
One of the most important ARMA Cold Weather Application Recommendations is to ensure there is zero frost or moisture on the deck. Moisture trapped under a mod-bit membrane will eventually turn into steam in the summer sun, causing the dreaded “blisters” that lead to premature failure.
Substrate Priming and Insulation Setup
Before the first sheet goes down, we often install polyisocyanurate (polyiso) insulation boards. These are secured with screws and large plates to ensure they don’t move. On top of the insulation, a “cover board” or “recovery board” is often used to provide a solid surface for adhesion.
If you are adhering directly to a non-porous surface, an asphalt primer is non-negotiable. The primer acts as a chemical bridge between the deck and the adhesive. We suggest letting the primer dry for at least 30 to 60 minutes until it is tacky but doesn’t transfer to your finger. This is a step many DIYers skip, and it’s a leading cause of seam failure. For those considering other modern systems, you can learn more about how this differs from TPO Roofing prep on our site.
Material Storage and Cold Weather Precautions
Ohio weather is unpredictable. If the temperature drops below 50°F (10°C), you must move your rolls into a heated storage area (ideally 70°F) for at least 24 hours before installation. Cold modified bitumen becomes stiff and loses its “tack.”
Pro Tip: If your rolls have been sitting in a cold truck in Zanesville, OH, they will have “memory” and want to curl back up. Unroll them and let them “relax” for at least 30 minutes on the roof before you start adhering them. This prevents the material from shrinking or buckling after it’s installed.
Step-by-Step Self-Adhering Modified Bitumen Installation
If you’ve decided on a self-adhering system, you’re using what many call the “giant sticker” method. While it’s easier than torching, it requires precision. If you’re feeling overwhelmed, don’t hesitate to contact us for Roof Repairs or professional help.
Step 1: Aligning the Base Sheet
The base sheet is your first line of defense. Start at the lowest point of the roof (usually the gutter line or drain) and work your way up. This ensures that water flows over the laps rather than into them—a concept known as avoiding “backwater laps.”
Snap a chalk line 18 inches from the edge to keep your first course straight. Align the roll, peel back the first few feet of the release film, and press it down. Once the start is secure, you can pull the film from underneath the roll as you kick it forward.
Step 2: Rolling for Adhesion
Pressure is the key to success with self-adhering products. After the base sheet is down, you must use an 80-pound roller over the entire surface. This ensures 100% contact and activates the pressure-sensitive adhesive. Focus specifically on the laps and edges. This is a critical step highlighted in every step-by-step guide for flat roofs.
Step 3: Staggering the Laps
When you move to the next row, overlap the side laps by at least 3 to 4 inches. For the end laps (where two rolls meet end-to-end), you need a 6-inch overlap. Most importantly, stagger your end laps so they don’t line up with the row next to them. This “offset” pattern prevents a single point of failure from creating a major leak.
Step 4: Applying the Granulated Cap Sheet
The cap sheet is the “pretty” layer that faces the sun. It has mineral granules that protect the bitumen from UV rays. Repeat the alignment and rolling process used for the base sheet. However, when you reach the end laps of the cap sheet, you have a “T-joint”—a spot where three layers of membrane meet. We recommend cutting a small 45-degree dog-ear on the middle layer to help the top layer lay flat and seal tightly.
For more complex issues like punctures or existing damage, refer to our Modified Bitumen Leak Repair Guide.

Critical Flashing Details and Seam Sealing
The vast majority of roof leaks don’t happen in the middle of the roof; they happen at the edges, pipes, and walls. These “terminations” require extra attention during modified bitumen installation.
Handling Edges and Terminations
For the perimeter of the roof, we use metal drip edges or gravel stops. These should be primed with asphalt primer before the membrane is adhered to them. In areas like Mount Vernon, OH, where wind can be an issue, we often use a termination bar—a metal strip screwed into the wall to mechanically hold the membrane in place.
At 90-degree wall joints, we use “cant strips.” These are triangular strips of wood or fiberboard that turn one 90-degree angle into two 45-degree angles. This reduces the stress on the membrane and prevents it from cracking as the building expands and contracts. If you need a professional eye on your current flashing, our Roof Inspections can identify these weak points before they fail.
Ensuring Watertight Seams and Laps
Even with self-adhering systems, some contractors prefer to “heat-weld” the seams with a small hot-air welder (like a giant hair dryer) to ensure a permanent bond. When you apply heat or pressure to a lap, you should see a tiny bead of bitumen (about 1/8 to 3/8 inch) “bleed out” from the edge. This is the visual confirmation that the seam is fused. For more technical details, refer to the standard specifications for modified bitumen flashing.
If you are using a cold adhesive method, use a 1/4-inch saw-toothed squeegee to get a uniform bed. Avoid over-applying; excessive solvent in some adhesives can actually damage the mod-bit compound. For high-performance commercial needs, SBS Commercial Roofing Systems offer some of the best seam integrity in the industry.
Maintenance, Longevity, and Common Mistakes to Avoid
A properly installed modified bitumen roof is a tank. It can handle foot traffic from HVAC technicians and the heavy snow loads we see in Central Ohio. However, even a tank needs a tune-up.
25-Year Life Expectancy
With routine maintenance, a mod-bit roof can easily last 25 to 30 years. Without it? You might be looking at a replacement in just 10 years. The primary killers of these roofs are:
- Ponding Water: If water sits for more than 48 hours, it can degrade the granules and stress the seams.
- Granule Loss: If you see “bald spots” where the black asphalt is exposed, UV rays will quickly make the membrane brittle.
- Blistering: Usually caused by moisture trapped during installation.
We recommend semi-annual Commercial Roofing inspections—once in the spring and once in the fall—to clear drains and check for seam delamination. For more information on long-term care, see this guide on Modified Bitumen Repair and Replacement.
Professional vs. DIY Installation Considerations
While self-adhering mod-bit is marketed as DIY-friendly, the stakes are high. A small mistake in flashing a parapet wall can lead to thousands of dollars in interior damage. Professional installers have the 80-pound rollers, the specialized primers, and the training to handle “torch-safe” details. Furthermore, many manufacturer warranties are only valid if the system is installed by a certified Zanesville, OH Roofing Contractor.
Frequently Asked Questions about Modified Bitumen Installation
Can modified bitumen be installed over an existing roof?
Yes, this is known as a “recover.” However, Ohio building codes generally only allow for two layers of roofing. If you already have two layers, you must perform a full tear-off. We also recommend installing a recovery board over the old roof to provide a flat, clean surface. If the old roof is saturated with water, a recover is a bad idea—you’ll just be trapping moisture that will destroy your new system.
What is the minimum temperature for self-adhering installation?
Ideally, you want the ambient temperature to be 50°F and rising. Some “winter grade” products can be installed down to 40°F, but you must keep the rolls in a heated environment until the moment they go on the roof. If the adhesive doesn’t “wet out” and bond to the substrate immediately, you risk wind uplift or leaks.
How long does a modified bitumen roof last?
Expect 20 to 30 years for a multi-ply system. Single-ply mod-bit installations are possible but generally don’t offer the same longevity. Adding a reflective elastomeric coating every 8 to 10 years can further extend this lifespan by protecting the membrane from UV damage and reducing cooling costs by up to 30%.
Conclusion
Modified bitumen installation is a proven, durable solution for the unique climate challenges we face in Ohio. Whether you are protecting a small residential porch in Mount Vernon or a massive industrial facility in Columbus, the multi-layered protection of mod-bit is hard to beat.
By choosing the right material (SBS for flexibility), preparing the substrate meticulously, and ensuring every seam is rolled and sealed, you can enjoy a worry-free roof for decades. At Mid Ohio Roofing, we take pride in our “Ohio weather expertise” and our commitment to transparent pricing.
Visit our site to Get a Commercial Roofing Quote and let’s make sure your building is covered by the best.