
What Every Ohio Homeowner Should Know Before Replacing Their Roof
Roof installation is one of the largest home improvement investments most homeowners will ever make — and one of the most consequential. Get it right, and your home stays protected for 25 to 50 years. Get it wrong, and you could be dealing with leaks, mold, and costly repairs within just a few years.
Here is a quick overview of what to expect:
| Topic | Key Facts |
|---|---|
| Average cost | $8,000 nationally; most homeowners spend $5,500–$11,000 |
| Typical timeline | 1–3 days for most asphalt shingle roofs |
| Most common material | Asphalt shingles (20–25 year lifespan) |
| Top cause of failure | Improper installation (over 70% of all roofing failures) |
| Permit required? | Yes, in most jurisdictions |
| ROI at resale | ~60% of project cost recovered |
A professionally installed roof does more than keep rain out. It protects your home’s structure, insulation, and interior — and in Ohio’s climate, where heavy snow, ice dams, and high winds are a real threat, the quality of your installation matters more than almost any other factor.
The stakes are high. According to the National Roofing Contractors Association (NRCA), improper installation accounts for more than 70% of all roofing failures — outpacing weather damage and material defects combined. That means choosing the right contractor and understanding the process isn’t just helpful — it’s essential.
I’m Albert Wengerd, owner of Mid Ohio Roofing, and I’ve overseen hundreds of roof installation projects across central Ohio, from simple residential replacements to complex commercial systems. This guide shares what I’ve learned to help you make a confident, informed decision.
Understanding the Average Cost and Factors of a Professional Roof Installation
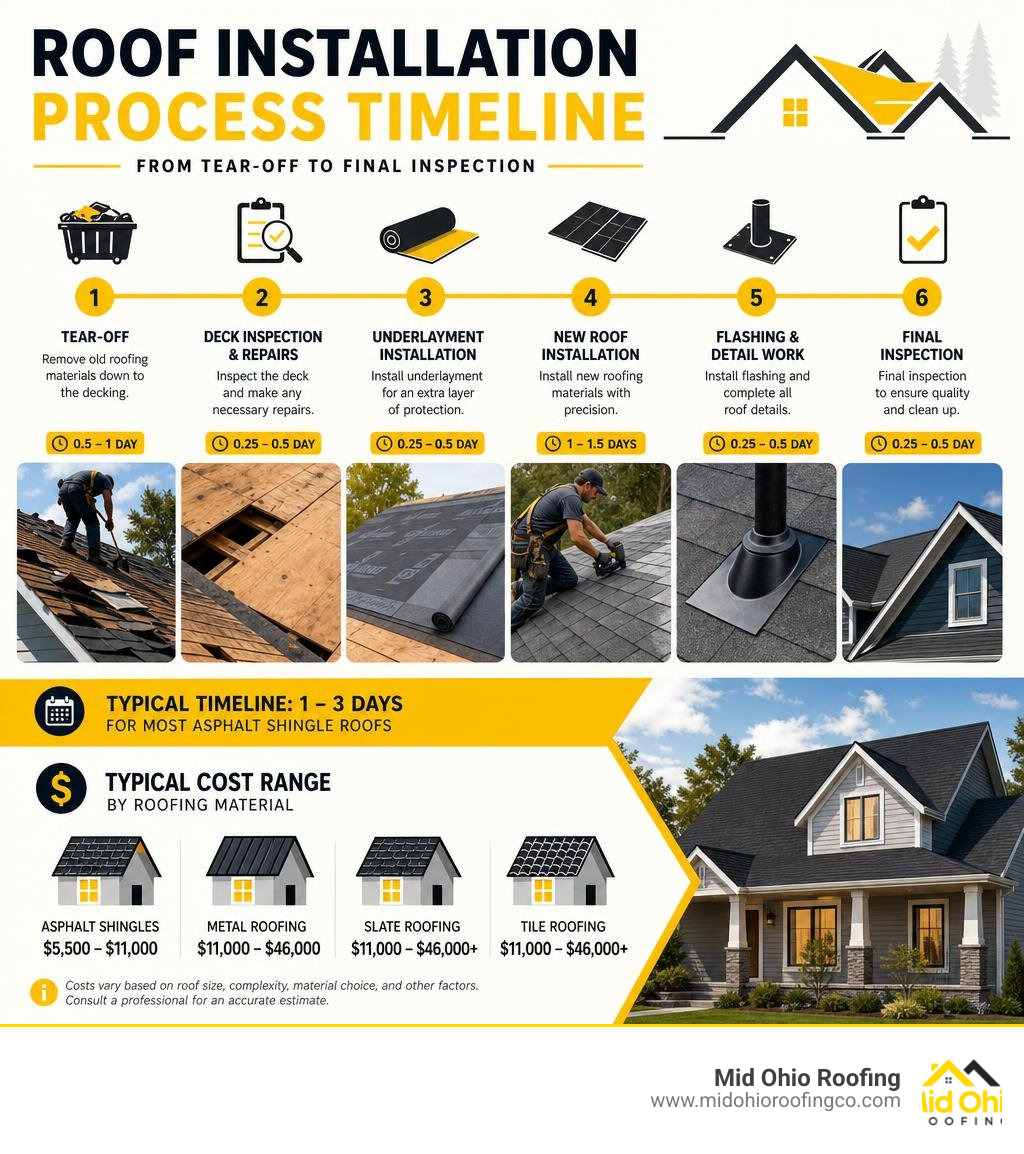
Calculating the exact cost of a new roof involves several moving parts. While the national average cost to replace a roof is around $8,000, with most people spending in the range of $5,500 to $11,000, your final invoice will depend on your home’s size, layout, and material choice. For example, a highly complex standing seam metal roof on a large home can reach up to $46,000.
To understand where your money goes, it helps to look at the cost breakdown. On average, labor accounts for roughly 60% of the total installation cost, while high-quality materials and disposal fees make up the remaining 40%. Fortunately, a new roof is a highly valued asset; a complete roof replacement will return around 60% of its upfront value when you sell your home.
When we prepare a quote for our residential roofing services, we measure the roof in “squares.” One roofing square equals 100 square feet of roof surface. The typical cost per square for a standard asphalt shingle roof ranges from $350 to $600 installed.
Several key factors dictate where your home falls on this pricing spectrum:
- Roof Size: The total square footage of your roof is the primary baseline for material and labor costs.
- Pitch and Slope Complexity: Steeper roofs are more difficult to walk on, requiring specialized safety harnesses, scaffolding, and extra labor. Roofs with multiple valleys, hips, dormers, and skylights require precise custom cuts and extra flashing, which raises the price.
- Roof Deck Repairs: If the underlying wood sheathing is rotted or sagging, it must be replaced. Replacing a full sheet of 7/16-inch OSB (Oriented Strand Board) typically adds $75 to $150 per sheet to the project cost.
- Geographic Location: Labor rates vary by region. Across our service areas in Central Ohio — including Columbus, Newark, Zanesville, and Mount Vernon — local labor markets are highly competitive, often averaging 10% to 20% lower than major coastal cities.
- Permit Fees: Pulling a building permit is a legal requirement in most Ohio municipalities. The permit process typically takes 2 to 5 business days and costs between $50 and $200.
To help you compare your options, we have compiled a breakdown of the most common roofing materials, their average installed costs, expected lifespans, and best-use cases:
| Roofing Material | Average Installed Cost (Per Sq. Ft.) | Expected Lifespan | Best-Use Case |
|---|---|---|---|
| Asphalt Shingles (3-Tab) | $3.50 – $5.50 | 20 – 25 Years | Budget-conscious homeowners with simple, low-slope roofs. |
| Architectural Shingles | $4.35 – $9.80 | 30 – 50 Years | Homeowners seeking a balance of durability, wind resistance, and curb appeal. |
| Standing Seam Metal | $14.00 – $25.00 | 40 – 70 Years | Long-term homeowners wanting maximum durability and low maintenance. |
| Clay & Concrete Tile | $15.00 – $30.00 | 50 – 100 Years | Premium homes with strong structural framing that can handle heavy loads. |
| Wood Shakes & Shingles | $10.00 – $20.00 | 30 – 40 Years | Historic or rustic homes requiring natural aesthetics and high wind resistance. |
| Synthetic & Composite | $12.00 – $22.00 | 50+ Years | Homeowners who want the look of slate or cedar shake without the heavy weight. |
If your current roof is showing signs of advanced wear, such as widespread leaks, curling shingles, or sagging areas, a professional roof replacement is the safest path forward to protect your property value and restore peace of mind.
The Step-by-Step Roof Installation Process
A successful roof installation is a highly coordinated, multi-step project. It is not just about nailing down new shingles; it is about building a cohesive, layered weather-protection system.
According to the New Roof Installation: Complete Process Guide 2026, a standard installation on an average-sized home (3,000 square feet or less) is typically completed in two days. On day one, the crew tears off the old materials and prepares the deck. On day two, they install the new underlayment, flashing, and field materials, followed by a thorough cleanup.
Preparing the Deck for Roof Installation
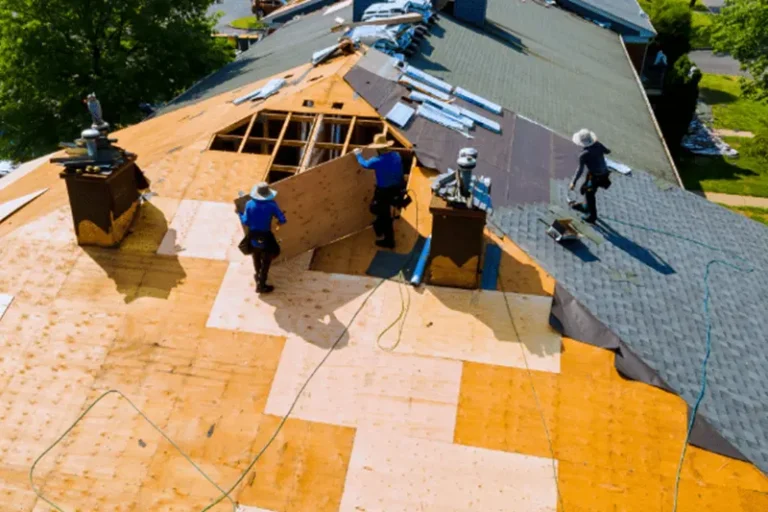
The longevity of your new roof depends heavily on the quality of the foundation beneath it. The preparation phase begins with a full tear-off, during which the crew uses specialized roofing forks to lift and remove old shingles, nails, and underlayment down to the bare wood deck.
Once the deck is exposed, our installers perform a meticulous structural inspection. We check for soft spots, water stains, delamination, and structural sagging. Any rotted, warped, or damaged OSB or plywood sheets are cut out and replaced with fresh, code-compliant sheathing. This step is critical because nailing new shingles into rotted wood will cause the fasteners to pull free, leading to premature roof failure. For detailed structural specifications on deck thickness and spacing, you can refer to the Owens Corning Roofing Installation Manual.
Layering the Roof System During Roof Installation
Once the deck is clean, flat, and secure, we begin rebuilding the roof system from the bottom up. Each layer plays a specific role in keeping water out of your home:
- Drip Edge: We install corrosion-resistant metal drip edges along the eaves (bottom edges) first, directly onto the wood deck. This prevents water from curling back under the shingles and rotting the fascia boards. Along the rakes (slanted side edges), the drip edge is installed over the underlayment.
- Ice-and-Water Shield: We apply a self-adhering, rubberized asphalt membrane along the eaves, valleys, and around penetrations. This leak barrier must extend at least 24 inches inside the warm exterior wall line to protect against water backup caused by winter ice dams.
- Synthetic Underlayment: Over the remaining exposed deck, we roll out a high-performance synthetic underlayment, overlapping the courses by at least 4 inches. Synthetic underlayment has largely replaced traditional 15-pound felt because it is stronger, highly tear-resistant, and provides a safer, slip-resistant walking surface for our crew.
- Starter Shingles: Before laying the main shingles, we install a starter strip course along the eaves and rakes. This starter row features a pre-applied adhesive strip designed to lock down the first course of shingles, preventing wind uplift at the roof’s edges.
- Field Materials: Next, we install the primary roofing material. If you choose asphalt shingle roofs, we nail them in a staggered pattern using 4 to 6 hot-dipped galvanized nails per shingle, depending on local wind zone requirements. If you opt for metal roofing, we secure the panels or metal shingles using specialized clips or color-matched screws with EPDM washers to ensure a watertight seal.
- Flashing: We install custom-bent metal flashing around chimneys, dormers, skylights, and vent pipes. We use step flashing (overlapping metal cards) along vertical sidewalls and counterflashing embedded into brick mortar joints to seal these highly vulnerable transition zones.
- Ridge Vents and Ridge Caps: Finally, we cut a continuous slot along the peak of the roof to install a ridge vent. This exhaust vent works alongside your soffit intake vents to maintain a balanced airflow, keeping your attic cool and dry. We then cover the vent with matching ridge cap shingles to complete the look.
DIY vs. Professional Roof Installation
With a wealth of online tutorials and home improvement store guides, some homeowners are tempted to tackle a roof installation as a weekend DIY project. While doing so can eliminate labor costs, the risks and long-term financial dangers of DIY roofing far outweigh the initial savings.
First and foremost is the extreme safety hazard. Roofing is consistently ranked among the most dangerous construction jobs in the United States. Working on steep pitches, handling heavy material bundles, and operating pneumatic nail guns at heights require specialized safety gear, fall-arrest systems, and professional training. One misstep can lead to catastrophic injury.
Furthermore, improper installation is responsible for more than 70% of all roofing failures, and a staggering 62% of roof leak calls are traced back to installation defects rather than material failure. If you install a roof yourself and it leaks, you have no recourse.
Most major manufacturers, including GAF and Owens Corning, will void their material warranties if the product is not installed in strict accordance with their technical manuals. Hiring a licensed, manufacturer-certified contractor unlocks extended, non-prorated system warranties that cover both materials and labor for up to 50 years.
| Aspect | DIY Roof Installation | Professional Roof Installation |
|---|---|---|
| Safety Risk | Extremely high; lack of professional fall-arrest gear. | Managed; crews use OSHA-compliant safety systems. |
| Warranty Coverage | Often voided; no labor warranty. | Full manufacturer material and contractor workmanship warranties. |
| Code Compliance | High risk of failed municipal inspections. | Guaranteed to meet or exceed local Ohio building codes. |
| Tools & Equipment | Expensive to rent/buy (compressors, nailers, safety harnesses). | Fully equipped with professional-grade tools. |
| Speed & Efficiency | Can take weeks, leaving the home exposed to weather. | Typically completed in 1 to 3 days. |
Before making a decision, it is wise to schedule comprehensive roof inspections with a licensed professional. A certified inspector can assess the true condition of your decking and structure, helping you determine if a spot repair is sufficient or if a complete replacement is required. For a deeper look at the tools, safety protocols, and technical demands of both approaches, read the Roofing Installation Guide: Professional & DIY Methods 2026.
Frequently Asked Questions About Roof Installation
Deciding on a new roof brings up plenty of practical questions. Here are clear, direct answers to the most common concerns we hear from homeowners in Central Ohio.
How long does a new roof installation take?
On average, a professional roof replacement on a standard home (3,000 square feet or less) takes 1 to 2 days to complete.
The exact timeline depends on three main factors:
- Weather: We cannot install roofing materials in active rain, snow, or extreme cold, as moisture can get trapped under the underlayment and sealants will not cure properly.
- Roof Complexity: Homes with steep pitches, multiple gables, and complex flashing details take longer.
- Material: Asphalt shingles are the fastest to install, while standing seam metal, tile, and slate require more meticulous handling and can take 3 to 5 days.
Do I need a permit to replace my roof?
Yes, you almost always need a building permit to replace a residential roof in Ohio.
Skipping the permit process is a major red flag. If a contractor suggests working without one, they are likely trying to avoid municipal inspections or do not carry the proper licensing and insurance. Pulling a permit triggers a local building inspector to review the work at key stages (such as deck preparation and final completion), ensuring the installation complies with Chapter 9 of the International Residential Code (IRC). This documentation is also crucial when you sell your home or file future insurance claims.
What is the difference between an overlay and a full tear-off?
The primary difference is that an overlay installs new shingles directly over your existing roof, while a full tear-off removes all old materials down to the bare wood deck.
While building codes in many areas allow up to two layers of asphalt shingles, we strongly recommend a full tear-off for several reasons:
- Deck Inspection: A tear-off is the only way to inspect the wood decking for hidden rot, mold, or structural sagging.
- Weight Load: Adding a second layer of shingles adds thousands of pounds of dead weight to your home’s framing.
- Moisture Trapping: An overlay can trap heat and moisture between the shingle layers, causing the new shingles to cup, curl, and fail prematurely.
- Warranty Integrity: Many manufacturers will not offer their best warranties on overlay installations.
Conclusion
A durable, high-quality roof installation requires a blend of premium materials, structural precision, and local expertise. At Mid Ohio Roofing, we take pride in being a trusted, local Mount Perry, OH contractor. We understand the unique demands of Ohio weather — from heavy winter snows in Newark and Zanesville to severe summer storms in Columbus and New Albany.
We back our work with licensed and insured crews, transparent pricing, and fast emergency response times when you need us most. If you suspect your roof has reached the end of its lifespan or has suffered storm damage, do not wait for a major leak to cause costly interior damage.
Let’s start your journey to a stronger, safer home today. Call our team directly at 855-955-3871 to schedule your professional consultation, or visit our Roof Installation Service Page to request a free, transparent estimate online.