
A Small Leak Can Become a Big Problem: What You Need to Know About EPDM Roof Patch Repair
EPDM roof patch repair is the process of fixing holes, tears, punctures, or failed seams in a rubber membrane roof using a patch kit — and most small repairs can be completed as a DIY project by a homeowner or property manager. For owners who need contractor-grade leak diagnosis or rubber roof service, Ohio roofing contractors specializing in EPDM roof systems can verify the failure point before water reaches insulation, decking, or interior finishes.
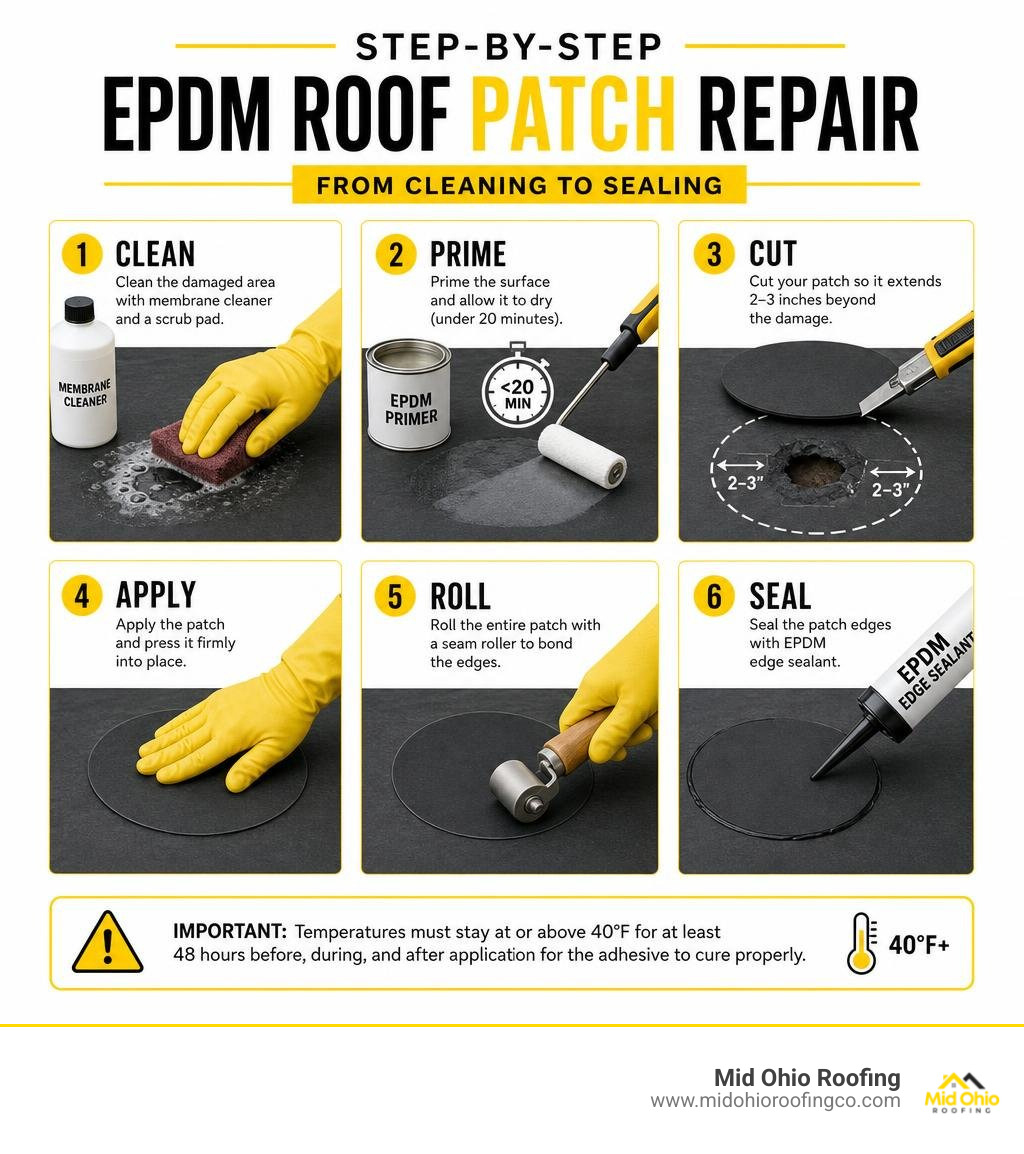
Here’s a quick summary of how it works:
- Clean the damaged area with membrane cleaner and a scrub pad
- Prime the surface and allow it to dry (under 20 minutes)
- Cut your patch so it extends 2-3 inches beyond the damage
- Apply the patch and press it firmly into place
- Roll the entire patch with a seam roller to bond the edges
- Seal the patch edges with EPDM edge sealant
Important: Temperatures must stay at or above 40°F for at least 48 hours before, during, and after application for the adhesive to cure properly.
Even a small puncture in an EPDM membrane can let water work its way into your roof assembly. The trouble is, water rarely shows up directly below where the damage is. It can travel along insulation, joists, or decking before dripping through your ceiling — sometimes several feet away from the actual breach. That’s what makes fast, correct repairs so critical.
EPDM (Ethylene Propylene Diene Monomer) is the dominant membrane material used on flat and low-slope roofs across Ohio — from commercial buildings and garages to residential additions and RVs. Because it’s a rubber-based system, it requires compatible materials and proper technique to patch correctly. The wrong sealant or adhesive won’t bond — and can actually make the repair fail faster.
As a roofing contractor serving Ohio homeowners and commercial property owners, I’ve seen plenty of patches that held for years and plenty that failed within months — the difference almost always comes down to prep work and the right materials.
I’m Albert Wengerd, owner of Mid Ohio Roofing, and I’ve worked on EPDM roofing systems across Central Ohio, including flat-roof commercial buildings, residential garages, and large warehouse projects. In this guide, I’ll walk you through everything you need to know to do an EPDM roof patch repair correctly — from choosing the right kit to sealing the final edge. A good patch buys time — but if your membrane is blistering, shrinking at the edges, or leaking along the seams, it may be telling you something bigger. Our EPDM roof repair specialists can tell you honestly whether a patch, a restoration coating, or a replacement is the right money.
EPDM Repair Kits and Technical Specifications
When dealing with low-slope membrane roofing, relying on quick store-bought quick fixes like standard silicone or hardware store duct tape will inevitably lead to failure. Single-ply rubber membranes require chemical compatibility. Performing a successful EPDM roof patch repair starts with understanding what goes into a dedicated repair kit and how those materials interact with your existing roof.
Standard commercial and DIY patch kits contain specific, contractor-grade items engineered to fuse chemically with the existing rubber membrane. A typical kit includes pre-cut round patches (often 8” or 8.5” circular shapes), specialized EPDM seam primer, a abrasive scrubbing pad, a wooden or silicone hand roller, cotton wiping cloths, and butyl-based seam tape or laminated flashing.
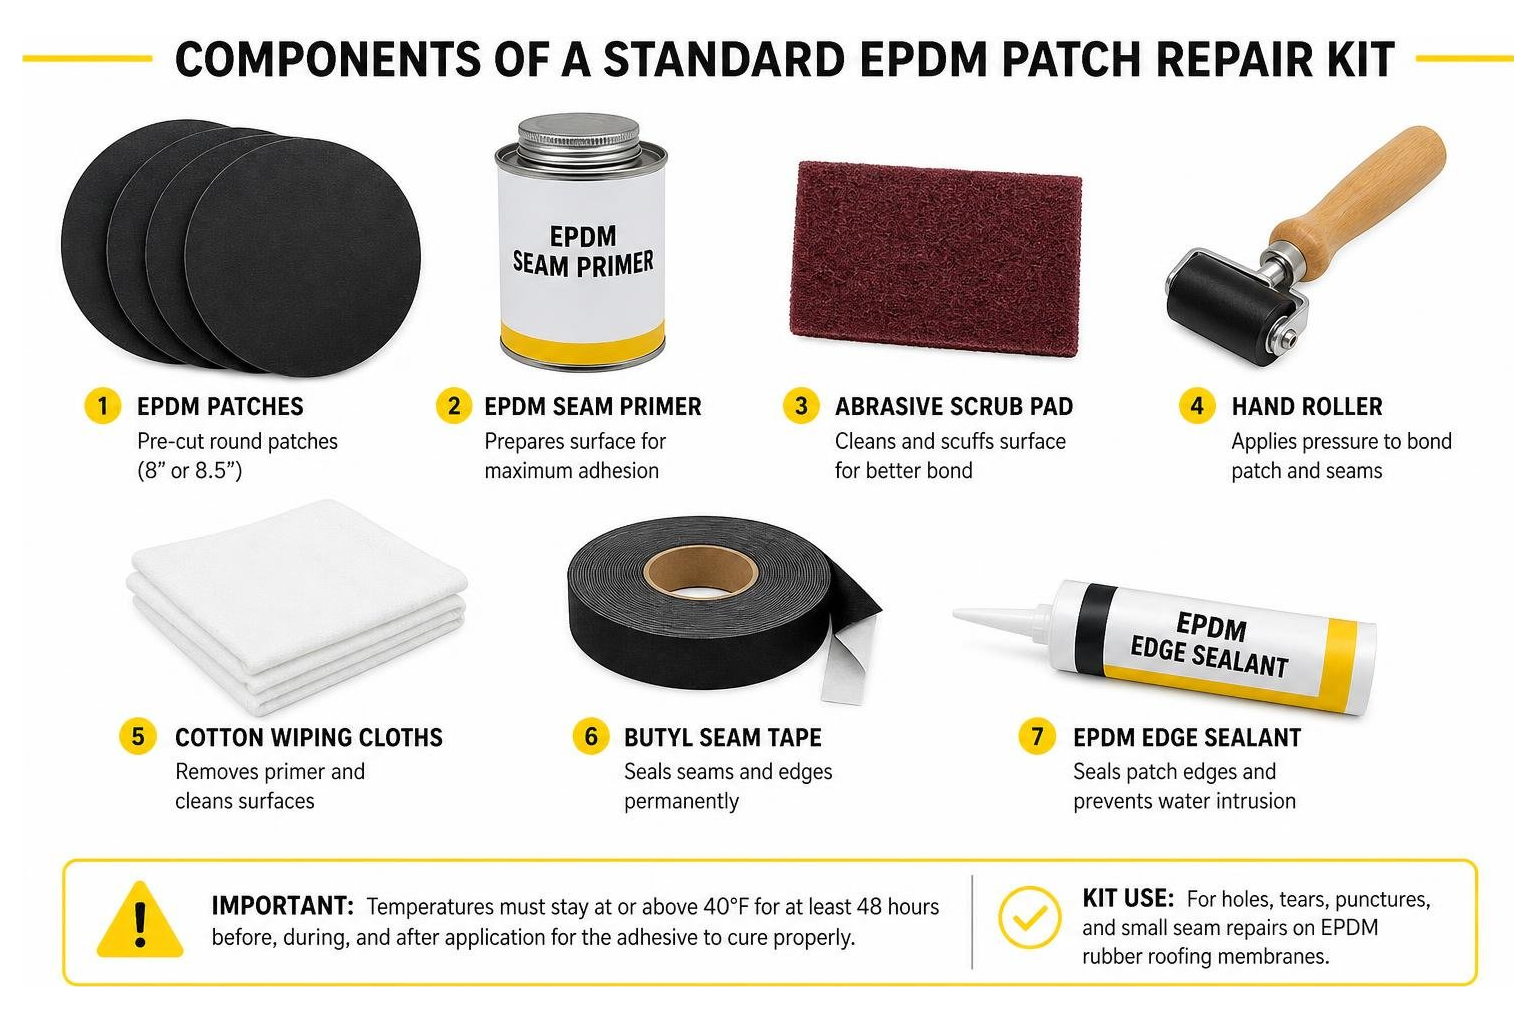
High-quality patch materials typically feature a nominal patch thickness of 68 mils, offering superior durability against physical punctures and foot traffic compared to standard 45-mil membrane sheets. Furthermore, seam primer is designed to strip away surface oxidation and factory release agents. A standard pint of EPDM primer provides approximately 25 square feet of coverage, which is more than enough to handle several spot repairs across a roof deck.
If you are evaluating your building’s overall membrane health, our specialized EPDM Roofing team always recommends matching patch mil-thickness to your existing installation to prevent uneven wear or stress concentration points.
| Specification / Parameter | Standard EPDM Repair Kit | High-Performance Commercial Kit |
|---|---|---|
| Patch Dimensions | 8.0″ – 8.5″ Round | 6″ x 10′ Laminated Flashing Roll |
| Membrane Thickness | 45 mil to 68 mil nominal | 68 mil to 90 mil nominal |
| Primer Volume & Coverage | 1 Pint (25 sq. ft.) | 1 Quart (50 sq. ft.) |
| Adhesive/Tape Base | Butyl-based pressure-sensitive tape | Uncured EPDM pressure-sensitive tape |
| Substrate Compatibility | EPDM, Metal, Wood, Masonry | EPDM, Aged Rubber, Treated Wood |
| Incompatible Substrates | PVC, TPO, Bitumen, Asphalt | PVC, TPO, Direct Polystyrene |
You can learn more about complete system specs by downloading official material guidelines such as the EPDM ROOF PATCH REPAIR KIT technical documentation.
Repairable Damage Types: Punctures, Tears, and T-Joints
Not every roof breach is created equal. Understanding the exact type of damage you have determines whether a basic patch will solve the problem or if broader intervention is necessary.
- Punctures and Pinholes: Often caused by dropped tools, falling tree branches, severe hail, or sharp foot traffic. These are ideal candidates for round peel-and-stick patches.
- Tears and Cuts: Rips caused by mechanical equipment movement or sharp objects dragged across the surface. Tears longer than 1/16 inch require cleaning, structural reinforcement using poly fabric or seam tape, and an overlapping membrane cover strip.
- Open Seams and Wrinkles: Caused by aging adhesive, water ponding, or structural expansion and contraction. Failed seams must be cleaned out, primed, and bridged with a 6-inch wide laminated cover strip.
- T-Joint Intersections: A classic leak point where three layers of EPDM membrane overlap. Standard flat tape cannot seal the step-off gap created at a T-joint, requiring pre-formed circular or uncured EPDM T-joint covers.
If you are suspecting a hidden breach but cannot pinpoint where water enters, conducting professional Roof Leak Detection saves time and prevents you from applying patches in the wrong spots.
Substrate Compatibility and Incompatible Materials
EPDM is extremely resilient, but it is chemically picky. EPDM pressure-sensitive repair tape and butyl adhesives will bond reliably to clean EPDM membranes, weathered wood, exterior plywood, clean steel, aluminum, and cured concrete. However, applying EPDM patches over incompatible materials will lead to immediate adhesion failure or chemical destruction of the membrane.
- PVC Roofing Incompatibility: Never attempt to use an EPDM patch kit on a PVC (Polyvinyl Chloride) roof. The plasticizers present in PVC will leach into the EPDM tape, turning the adhesive into a gummy, non-sticky liquid.
- Petroleum and Solvent Degradation: EPDM rubber is severely vulnerable to petroleum products, mineral oil, grease, solvents, animal fats, and vegetable oils. Exposure to these substances swells and rots the rubber, causing it to lose structural strength.
- Asphalt and Bitumen Contamination: Bituminous materials and standard roofing plastic cement digest EPDM rubber. Never use asphalt-based “black gunk” or roof mastic to patch an EPDM roof leak.
For extreme thermal environments where UV exposure and surface heat cause continuous membrane stretching, review the technical recommendations in this EPDM Roof Repair Guide: Choose the Right Sealant for Extreme UV and Heat – EPDM Roof Coatings Blog .
Surface Preparation, Weather Constraints, and Safety
The absolute number-one reason an EPDM roof patch repair fails prematurely is improper surface preparation. You can purchase the highest-grade kit on the market, but if you attempt to stick a patch over oxidized rubber, dust, or moisture, it will peel off with the first windstorm.
EPDM single-ply sheets develop a layer of carbon dust and environmental oxidation over time. Furthermore, new EPDM membrane arrives from the factory dusted with talcum powder to prevent the roll from sticking to itself. Both contaminants act as barrier layers that stop tape adhesives from sticking.
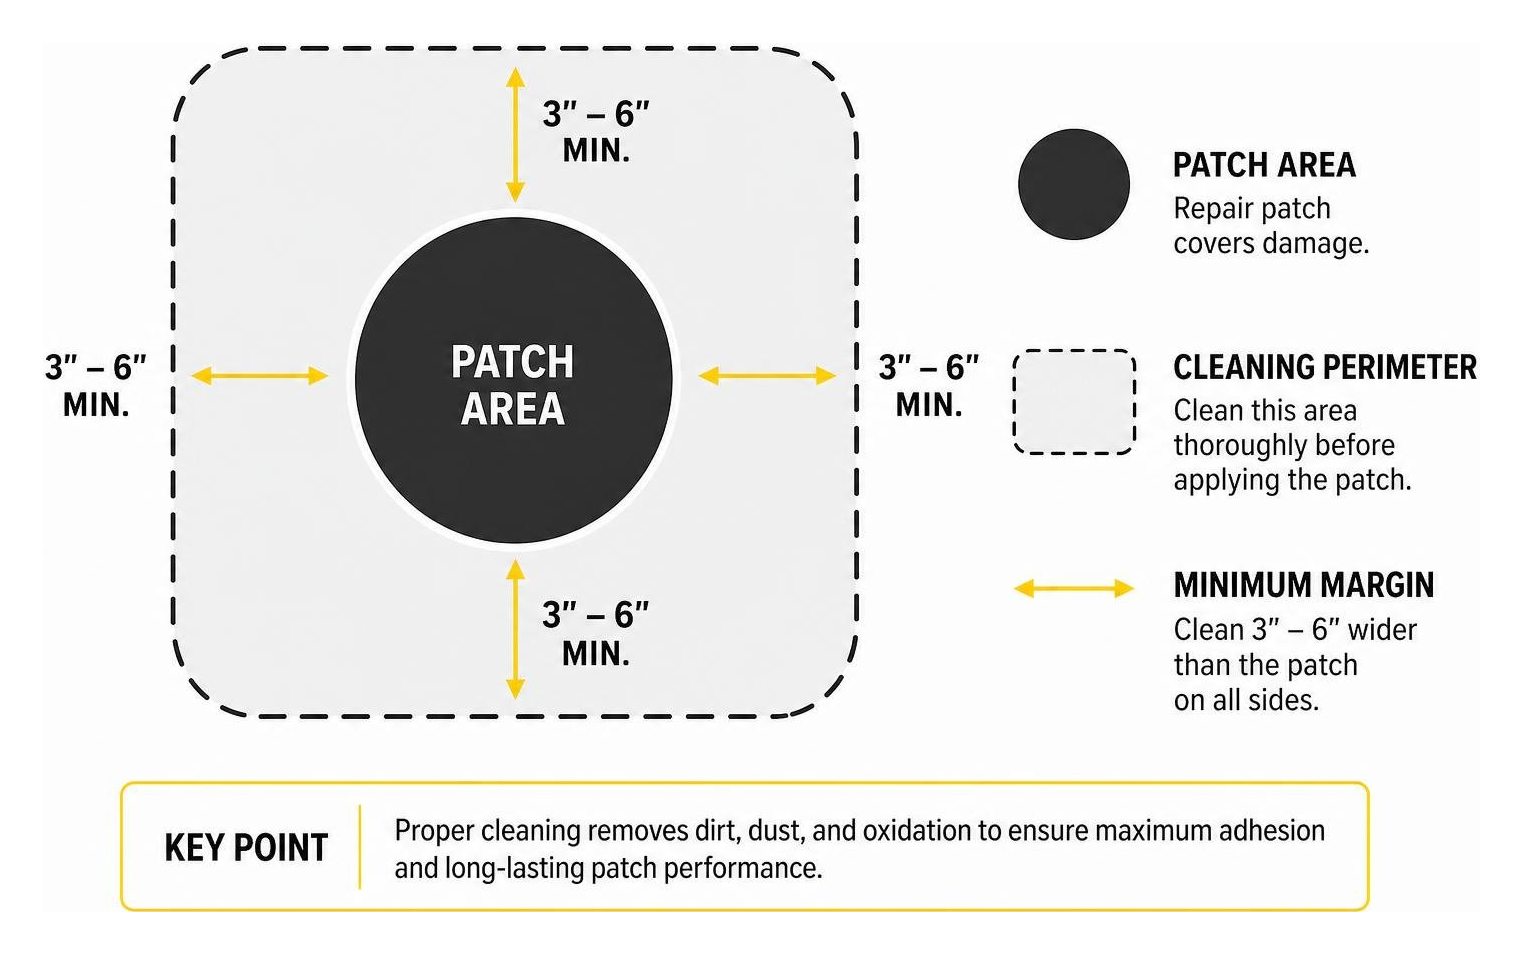
Proper surface prep requires cleaning an area at least 3 to 6 inches wider than the patch itself on all sides. Scrubbing the area with a non-abrasive dish soap or TSP (Trisodium Phosphate) removes heavy dirt, followed by a thorough rinse. Once dry, you must scrub the surface using a dedicated membrane cleaner (such as solvent-based cleaner) and an abrasive scrub pad to strip away oxidation until the membrane turns rich, dark black.
When maintaining complex single-ply roofs, consulting our experts on Flat Roof Systems ensures your repairs comply with manufacturer warranties and local building codes across Central Ohio.
Temperature and Environmental Conditions for Application
Weather plays a massive role in whether your patch bonds or bubbles. EPDM primers and butyl adhesives rely on temperature-sensitive chemical reaction times and solvent evaporation rates.
- The 40°F Rule: EPDM repair kits must be applied when ambient and surface temperatures are at 40°F (4°C) and rising. Crucially, the temperature must remain at or above 40°F for at least 48 hours following installation to allow the pressure-sensitive adhesive to cure.
- Ideal Temperature Window: Optimal working conditions range between 50°F and 100°F. Within this window, primers dry evenly within 5 to 20 minutes without forming surface condensation.
- Cold Weather “Blushing”: If you apply EPDM primer below 40°F or during high humidity, rapid solvent evaporation cools the membrane surface below the dew point. Moisture condenses on the tacky primer (known as “blushing”), creating a water film that permanently prevents the patch from adhering.
- Dry Weather Window: Work must be performed on a 100% dry substrate. Rain, dew, ice, or snow will ruin the repair instantly.
Essential Safety Precautions and Chemical Handling
Working with EPDM primers and adhesives requires strict attention to chemical safety and rooftop hazard management.
- Flammability Warnings: EPDM primers contain high concentrations of flammable solvents like acetone and 1-Chloro-4-(trifluoromethyl)benzene. Flash points can be as low as -4°F (-20°C). Keep all open flames, spark sources, hot equipment, and smoking materials far away from open primer cans.
- Personal Protective Equipment (PPE): Always wear solvent-resistant nitrile gloves when handling primers and edge sealants. Standard latex gloves will dissolve on contact. Eye protection (goggles or safety glasses with side shields) is mandatory to prevent chemical splashes during scrubbing.
- Respiratory Precautions: Solvent vapors accumulate quickly, especially near parapet walls or rooftop HVAC intakes. Work in well-ventilated areas and wear an organic vapor respirator if working in enclosed roof pockets.
- Container Care: Primers and bonding adhesives flash off rapidly. Keep container lids tightly closed when not actively dipping your scrub pad. Opened cans of bonding adhesive will skim over and spoil within 48 hours if left unsealed.
Step-by-Step EPDM Roof Patch Repair Process
Performing an EPDM roof patch repair correctly follows a distinct sequence. Skipping a single step — such as omitting primer or failing to roll the seam — practically guarantees a future leak.
For detailed background on diagnosing complex single-ply defects, explore this comprehensive EPDM Roof Repair Guide: How To Fix Leaks, Tears, Seams and Failed Patches – Rawlins Blog .
Preparing the Substrate for EPDM Roof Patch Repair
Follow this exact sequence to prepare the damaged membrane for patch application:
- Mark the Damage Zone: Locate the puncture or tear and use chalk to draw a rectangle or circle around it, measuring 2 to 3 inches wider than the damage in every direction.
- Wash Off Debris: Sweep away loose dirt, gravel, or leaves. Wash the marked area using clean water and a mild non-sudsing cleaner or TSP, wiping thoroughly with a clean rag.
- Clean off Moisture: Allow the area to dry completely. Trapped moisture under a patch creates steam bubbles during hot weather, lifting the repair tape off the roof.
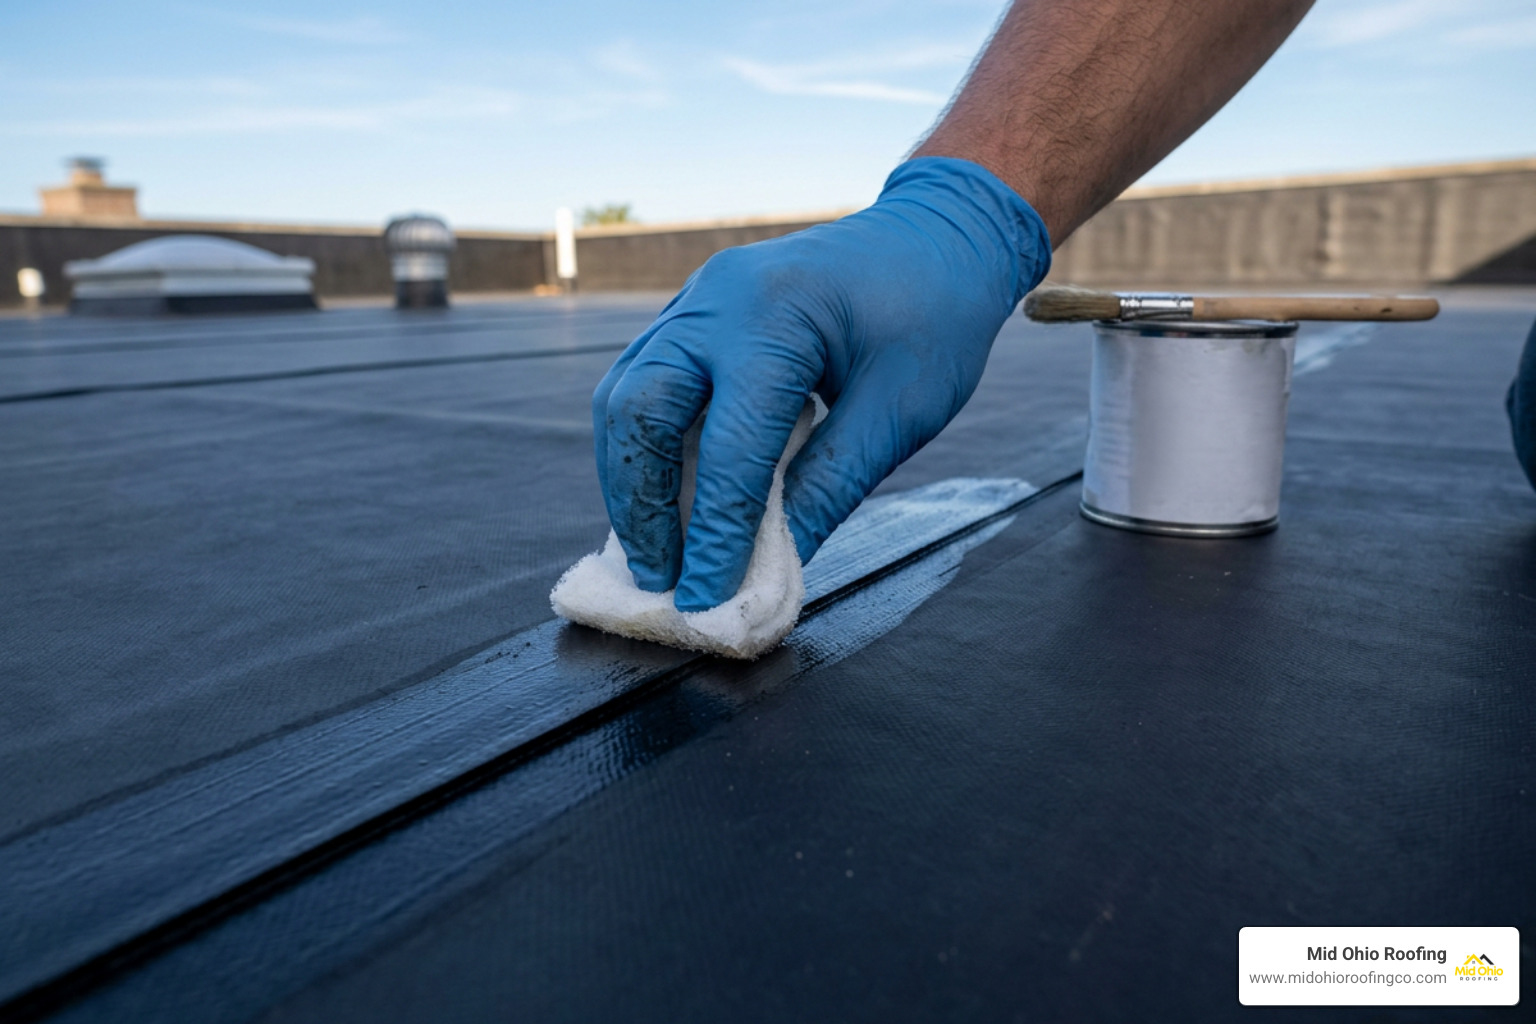
- Scrub with Solvent Cleaner: Apply specialized EPDM membrane cleaner to the area. Use an abrasive scrubbing pad to remove embedded chalking, oxidation, and factory release agents until the membrane shows a uniform matte-black appearance.
- Apply EPDM Primer: Dip your scrub pad into the EPDM seam primer. Apply a uniform, thin coat of primer over the entire cleaned area (extending beyond the patch outline). Do not leave puddle spots or bare streaks.
- Test for Flash-Off Dryness: Wait 5 to 20 minutes (depending on ambient temperature). Touch the primed surface with a clean, dry finger. The primer should feel tacky but should not transfer or string off onto your finger. If it pulls away, it needs more drying time.
Rolling and Sealing an EPDM Roof Patch Repair
Once the primer has properly flashed off, move immediately to patch installation:
- Prepare the Patch Material: Use a pre-cut 8.5-inch round patch or cut a piece of self-adhesive EPDM flashing tape. Always round off sharp square corners with scissors using a 1-inch minimum radius; sharp 90-degree corners peel up easily over time.
- Position and Remove Release Liner: Center the patch directly over the puncture. Peel back half of the paper release liner, taking care not to touch the tacky tape backing with dirty fingers or let it touch unprimed membrane.
- Mate the Patch to the Substrate: Carefully fold the patch down onto the primed surface from the center outward to prevent trapping air pockets. Remove the remaining release paper and lower the second half into place.
- Apply Hand Pressure: Press the patch firmly down from the center toward the outer perimeters using flat palm pressure.
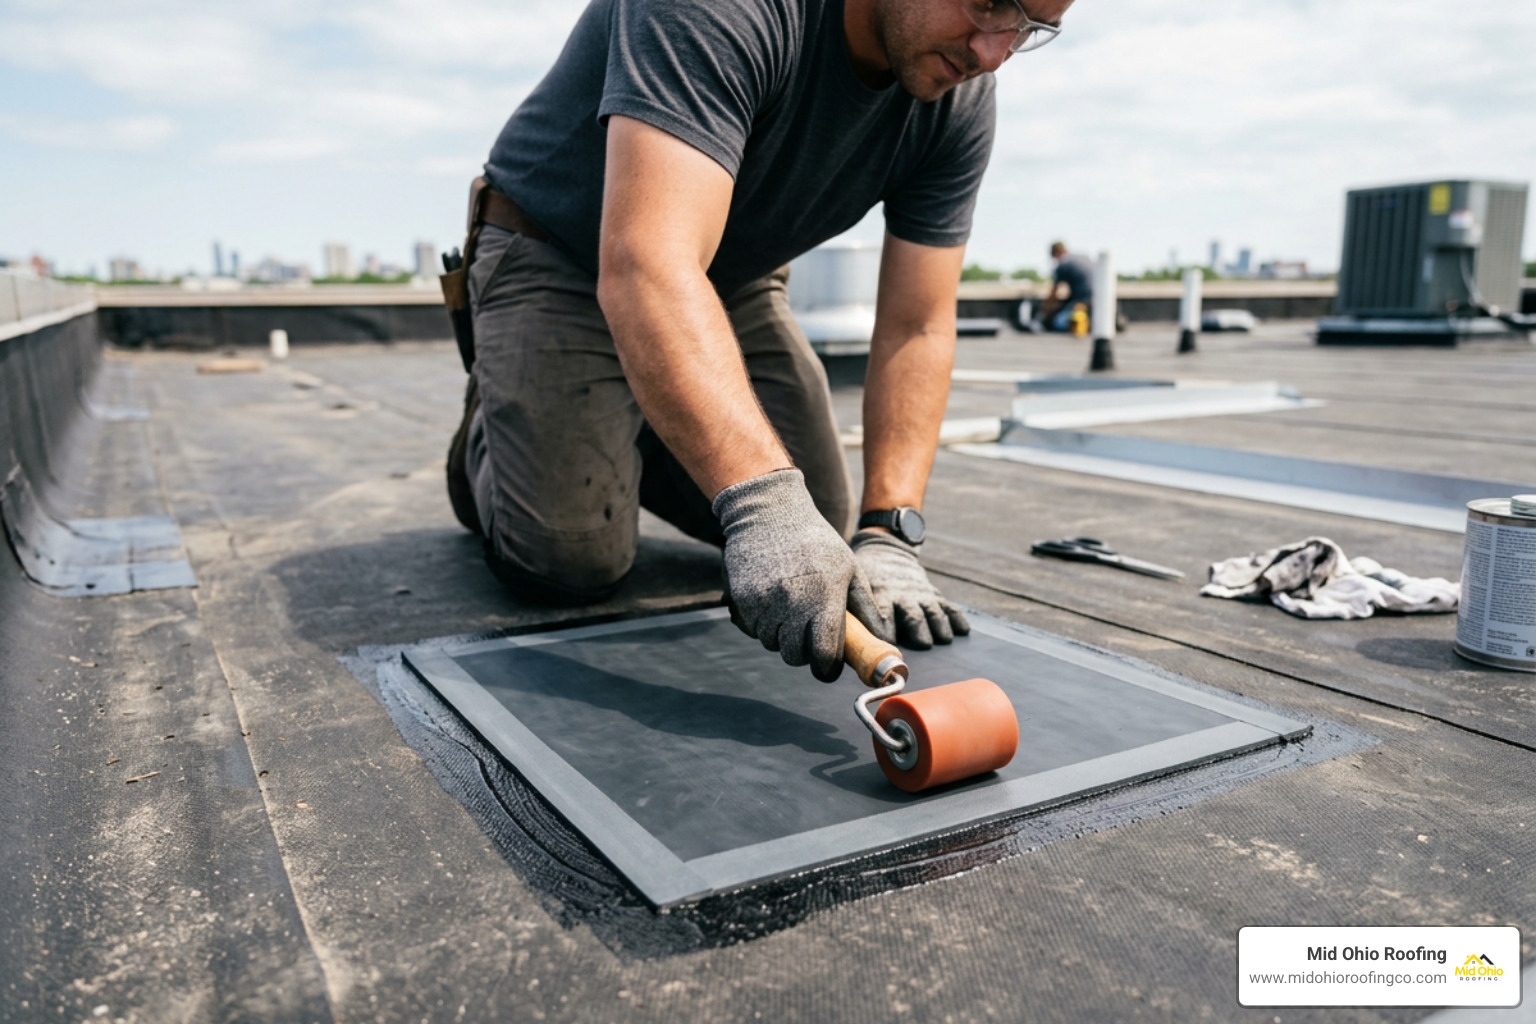
- Roll Thoroughly with Roller: Take a 2-inch wide silicone or hard wood seam roller. Roll the entire patch with firm, positive pressure. Roll perpendicular across the edges, starting from the middle of the patch and working toward the outer edges to force out trapped air bubbles and crush the pressure-sensitive adhesive into the primed rubber sheet.
- Seal the Perimeter Edges: Apply a continuous 1/4-inch bead of EPDM lap sealant (edge sealant) around the entire outer perimeter border of the patch. Feather the bead gently with a trowel or gloved finger so water runs smoothly over the edge without damming.
For specialized seam overlaps and T-joint repairs, refer to the manufacturer TDS for the Millennium EPDM T-Joint Patch – H.B. Fuller system.
Patched it and still leaking?
We offer free inspections and straight repair-vs-replace answers on EPDM systems across Central Ohio. See our EPDM roofing services or call (740) 644-2257.
Patch Kit Storage, Shelf Life, and Component Comparison
EPDM patch repair components rely on active chemical adhesives and uncured or semi-cured tape backings. Because of this, kit components do not last indefinitely sitting on a warm shelf or inside the back of a service truck.
If your facility manages multiple commercial properties across Ohio and faces recurring single-ply failures, scheduling regular Roof Inspections or partnering with our Commercial Roofing team will help identify aging membrane assemblies before widespread leaks occur.
Comparing Kit Components and Price Ranges
EPDM patch kits on the market range widely in contents, quality, and price point depending on your specific project needs:
- Basic DIY Spot Patch Kits ($30 – $60): Typically contain two to four 8-inch peel-and-stick circular patches, a small 1-pint can of primer, an abrasive scrub pad, a small wooden roller, and basic instruction sheets. Ideal for quick home garage or RV repairs.
- Complete Contractor Emergency Repair Kits ($130 – $180): Include a 10-foot roll of 6-inch laminated flashing, 10 feet of seam cover tape, three pre-formed 6-inch round T-joint covers, a bottle of membrane cleaner, a pint of primer, a heavy-duty 2-inch silicone roller, safety gloves, and lap sealant.
- Liquid-Applied Reinforced Patch Systems ($80 – $150): Utilize liquid rubber coatings embedded with poly-fabric scrim mesh rather than self-adhesive tapes. Excellent for odd-shaped penetrations, pipe boots, and corrugated metal-to-EPDM transitions.
If your roof system has suffered extensive storm or mechanical damage, our dedicated team for Roof Repairs can step in to perform full-scale membrane restoration.
Proper Storage Methods to Maximize Shelf Life
The pressure-sensitive butyl adhesives used on EPDM repair tapes gradually cross-link and harden over time if exposed to heat, leading to loss of tackiness.
- Standard Shelf Life: Most sealed, unopened EPDM patch kits maintain a 1-year shelf life from the date of manufacture when stored properly. Specialized uncured T-joint patches often carry a shorter 9-month shelf life.
- Storage Temperature Control: Unopened kits must be stored indoors in a dry warehouse environment maintained between 60°F and 80°F (15°C to 27°C). Storage range limits should never drop below 40°F or exceed 110°F.
- Avoid Rooftop Storage: Never store patch kits or primer cans inside job site tool boxes left out in direct summer sunlight or on top of hot roofs. High heat cooks the volatile solvents in the primer and ruins the tape adhesive within days.
Frequently Asked Questions About EPDM Roof Repair
Roofing maintenance raises many practical questions for property owners. For answers to broader questions beyond single-ply patch work, check out our helpful Roofing FAQs page.
Can an EPDM roof patch kit be used on PVC roofing?
No, an EPDM roof patch kit cannot be used on a PVC roofing membrane. PVC (Polyvinyl Chloride) and EPDM (Ethylene Propylene Diene Monomer) are chemically incompatible single-ply systems.
PVC membranes contain liquid plasticizers that impart flexibility to the sheet. When an EPDM patch with butyl tape adhesive is applied over PVC, these plasticizers migrate directly into the tape adhesive. This chemical interaction breaks down the butyl compound, turning it into a tacky, liquid sludge that completely loses its structural bond. PVC repairs require heat-welded PVC patches or specialized solvent-weld PVC adhesives.
How long must temperatures stay above 40°F during patch repair?
Ambient and surface temperatures must remain at 40°F (4°C) and rising for at least 48 hours during and immediately following an EPDM patch application.
While the tape may feel sticky immediately upon placement, pressure-sensitive butyl adhesives require sustained warmth to achieve a full chemical cure and complete mechanical bond with the primed EPDM sheet. If freezing temperatures occur within this initial 48-hour cure window, the adhesive hardens prematurely, preventing deep molecular cross-linking. This creates micro-gaps along the patch perimeter where wind-driven water can enter.
How far beyond a puncture should an EPDM patch extend?
An EPDM roof patch must extend at least 2 to 3 inches in every direction beyond the outer perimeter of the hole, puncture, or tear.
For example, if you are patching a 1-inch puncture, your total patch diameter should be at least 5 to 7 inches wide. This 2- to 3-inch overlap margin provides adequate surface area for the seam tape to form a watertight perimeter seal against water pressure and wind uplift. Additionally, always make sure the corners of custom-cut patch rolls are rounded off; square sharp corners create stress points that lift under foot traffic or ice accumulation.
Conclusion
A small hole in a rubber roof does not have to mean a costly interior disaster. By selecting compatible materials, preparing the membrane thoroughly, maintaining correct application temperatures, and following a step-by-step rolling process, an EPDM roof patch repair can protect your building structure for years to come.
However, keep in mind that spot patching is designed for localized physical damage like dropped tools or small punctures. If your rubber roof is experiencing widespread seam failure, severely shrinking membrane margins, or saturated insulation beneath the rubber deck, spot patching will only delay the inevitable.
When your building exhibits extensive damage across Columbus, Newark, Zanesville, or surrounding Central Ohio areas, explore our structural solutions on Top-Tier EPDM Roof Replacement Columbus Solutions or read how property owners solve persistent flat roof leaks with Athens EPDM Replacement.
When severe weather hits or an unexpected leak threatens your property interior, count on Mid Ohio Roofing for fast, professional help. Contact us right away for Emergency Roofing services or immediate Emergency Tarping to safeguard your building structure.
Ready for a permanent solution to your flat roof worries? Reach out to our expert team at Mid Ohio Roofing today or schedule a comprehensive roof assessment directly through our EPDM Roofing Services page!